|
Tutorial 16
You can use this arrow as a bookmark.
Drag it where ever you want to..
Download the zipfile with the materials here
Place the mask in C-program files- Jasc soft inc - Masks
Step 1
Open a new
image 400x300 pixels, transparent
Foreground color is #dcb07b
Background color is #f2e4c2
Foreground on gradient, angle on 237, linear, invert yes
Flood fill the image with the gradient.
Add a new raster layer.
Foreground back on normal color again.
Flood fill the new raster layer with the foreground color.
Step 2
Layers -
Load/Save Mask - Search for the mask "Blume auf buch" and click
load.
(Source luminance/ Fit to Canvas/ Hide all Mask
Click right in the layer palette on the mask layer and choose Merge
- Merge Group
Effects - 3D effects - Drop shadow 1-1-65-1
In your layer palette the transparency on 38
Open the tube T-005 (made by myself)
Copy the tube and paste as new layer in your image.
In your layer palette the transparency on 26
Step 3
Open the tube "vrouw"
Copy the tube and paste as new layer in your image
Drag the woman to the left with your move tool
Open the tube T-006
Copy the tube and paste the flowers as new layer in the image
Drag it to the right corner (under) so you don't see the green
anymore.
Effects - 3D effects - Drop shadow 1-1-65-1)
Layers - Merge all layers
Click with right in your layer palette and duplicate the merged
layer 2x
Lock the upper 2 layers by clicking on the eye behind the layer
Step 4
Open the tube
T-004
Copy and paste as new layer in the image
Image - Resize - 70% (Resample using: Bicubic) DON'T resize all
layers!
Drag the diamond to the right upper corner.
Duplicate the layer with the diamond 2x
also and lock the upper 2
File - Jasc Sofware Products - Launch
Animation Shop
In Animationshop: File - Open - Go to the folder where you put the
Zilver 5.gif in
Make sure that you select GIF at the Files of type.
Open the Zilver.gif
Now you see 3 little frames with silver sparkles
Edit - select all
File - export - to paint shop pro
Now you automatically go back to paint shop pro and see the zilver.
gif there
The zilver.gif will have 3 layers (lijst1, lijst 2 and lijst 3)
Lock lijst 2 and 3 and select lijst 1.
Put your background color on pattern now, click in it and select the
sparkle pattern (scale 50)
Step 5
Go back to your
image and select raster 1 in your layer palette (the diamond)
Select your magic wand and select all the areas in the diamond (Hold
your shift to select more at once)
Selections - Modify - Expand 1 pixel
Flood fill the selections with the pattern.
Selections - select none.
If you've done everything ok, than you will have 2 layers open in
your layer palette.
1 background and 1 raster layer.
Go to layers - merge - MERGE VISIBLE
Layers - Arrange - send to bottom
Click right in the layer and rename it, call it A
Close this layer by clicking on the eye behind it.
Step 6
Open 1 copy of
the background and 1 copy of the raster layer.
Select the raster layer.
(diamond)
Select your magic wand and select all the areas in the diamond (Hold
your shift to select more at once)
Selections - Modify - Expand 1 pixel.
Go back to the zilver.gif now
Close lijst 1 and open and select lijst 2
Click in the background color and change the pattern to the other
sparkle pattern (not the current)
Go back to your image now
Flood fill the selections with the pattern.
Selections - select none.
If you've done everything ok,
than you will have 2 layers open in your layer palette.
1 background (copy) and 1 raster layer (copy).
Go to layers - merge - MERGE VISIBLE
Layers - Arrange - move down
Rename this merged layer and call it B.
Now close this layer (eye) and open the last background copy and the
last layer copy.
Select the raster layer (diamond)
Select your magic wand and
select all the areas in the diamond (Hold your shift to select more
at once)
Selections - Modify - Expand 1 pixel.
Go back to the zilver.gif now
Close lijst 2 and open and select lijst 3
Click in the background color and change the pattern to the other
sparkle pattern (not the current)
Go back to your image now
Flood fill the selections with the pattern.
Selections - select none.
Rename this last merged layer and call it C
Step 7
Open all 3
layers now.
Select layer A (the lowest)
File - Save as - tutorial 16 (in a folder where you will find it
back!)
Save as type: Animation Shop (second from the top)
Go to Animation
shop.
Open the Wizard animation (under file)
Select:
Same size (next)
Transparent (next)
Center and canvas color (next)
Yes, repeat and 12 seconds (next)
Add image and search for tutorial 16
File type is Paint Shop Pro image!!
Open the image tutorial 16 (next)
Finish
By clicking here
 you can see your animation
File - save as- choose a name and select a folder.
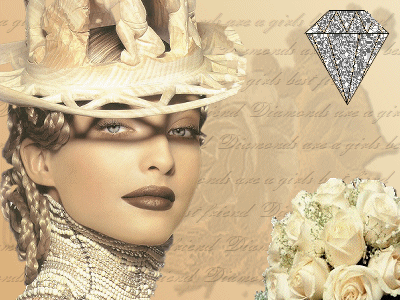
Your creation
is finished, maybe it wasn't the easiest, but the result is
nice.....I think
Will you tell me in my guestbook what you think of the tutorial?
|